Yuki shares her thoughts as this evening draws to a close....
The crafty adventures of a mom, toydesigner, illustrator, jewelry lover, knitter & all around maker of things who needs music like others need air, & makes a wicked decent apple pie!
Monday, October 31, 2011
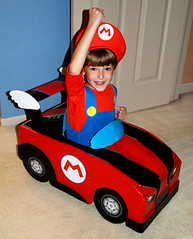
final mario kart halloween costume diy handmade from a plain cardboardbox by isewcute

final mario kart halloween costume diy handmade from a plain cardboard box by isewcute, a photo by isewcute on Flickr.
This is an update to my previous post here: http://isewcute.blogspot.com/2011/10/halloween-costume-wip-its-mario-kart.html
I snapped some pics of the final mario kart costume in case it gets destroyed while trick or treating.
Made with a plain old cardboard box, hot glue, paint, and printed out some artwork for the logos, headlights, and wheel hubs.
Mario suit was a store bought one... I wasn't going to sew this Halloween.
I'm just so glad he's happy with it. That's what really matters.
Happy Halloween!
Friday, October 28, 2011
Halloween Crafts for Kids to Do Part 1 - Halloween Fun Size Candy People as seen on Martha Stewart
I think crafting brings our family closer together. We all enjoy working on an exciting new project especially holiday-themed crafts.
When I saw an episode of the Martha Stewart show with the cutest little girl helping Martha make Halloween candy people, I just knew we had to try it as a family.
All you need to do the project is:
lollipops for the heads,
boxed candies for the bodies,
and long skinny candies like tootsie rolls, twizzlers, or sweet-tarts for the arms & legs.
Everything is glued together with a low temp. melt hot glue gun.
On the show, they also used halloween stickers to stick onto the lollipops for faces...but I was lucky to find Halloween lollys with the faces on them.
First we attached the lollipop heads to the boxes by attaching the lollipop stick to the back of the boxes with hot glue. The kids picked out their arms & legs in mostly matching pairs... and we glued those to the sides & bottom of the boxes. After a few minutes, the glue was set.
It was such a cute, quick, & relatively cheap craft to do that I just wanted to share with y'all.
My girl took 20 of these 'candy people' to her school's Halloween party and they were a big hit with her friends.
Tuesday, October 25, 2011
Time to Learn Something New... How to Wire a Flea Market Lamp
I have this gloriously tacky shabby chic lamp that I bought a few years back at the Kane County flea market in the Chicagoland area.
It has a cute chubby cherub perched on the base. I figured it would make a great boudoir lamp & had used it as my main source of lighting in the bedroom until it started flickering. The bulb wasn't loose, and I figured the wiring must be going bad on it since it flickers when I knock on the bedside table.
I found this complete lamp wiring kit at Pat Catans & plan on figuring out how to do this & I'm going to make it so this week. Just say no to procrastinating right? I hope it goes well! Wish me luck!
Monday, October 24, 2011
Finished DIY Candy - Handmade Lollipop Photos from Last Week
I'm finally getting around to uploading finished lollipop pics from last week's candy making extravaganza.
After boiling the sugar on the stove until it reached hard crack stage, I added the flavoring & colors... then spooned the mixture into lollipop molds to cure. After the candy cools, they just pop out. I roll them in powdered sugar to keep them from sticking to the wrappers.
Wednesday, October 19, 2011
It's that time of year again... Candy Making Time!!!
I've been making batch after batch getting ready for our little church's holiday bazaar. The recipe I use is one of those magical secret ones belonging to our grandma, but if you would like to try making this for yourself & have your entire house reeking of cinnamon & peppermints like mine, the package of candy flavor oils includes a great recipe!
I'm mostly using Lorann oils...and they are yummo! If you can't find them locally...then you may find them here online.
This is the work in progress... reducing the sugar down. I highly recommend getting an accurate candy thermometer. The one I had last year was tricky, but this year I'm using a digital model. Super high tech, eh?
I'll upload pics of the finished lollipops & jars of candy tomorrow. So far, everything I've made is red & I'd love to share a rainbow of candy pics with y'all.
Feel free to comment me any questions & stay crafty!
Friday, October 7, 2011
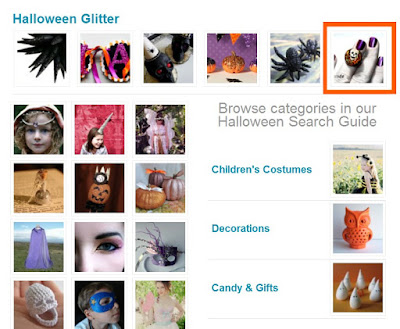
Etsy Finds Featured my Halloween Resin Glitter Dome Ring Today
I'm just over the moon about this! ♥♥♥Thank for featuring my ring Etsy!!!♥♥♥
I have a limited amount of these rings available here, so get yours before they're all gone!
Happy Halloween!
I have a limited amount of these rings available here, so get yours before they're all gone!
Happy Halloween!
Tuesday, October 4, 2011
Halloween Costume W.I.P. It's Mario Kart!
This year I wanted to just get a store bought costume for my boy after last year's labor-intensive 'oompa-loompa' getup... so I presented the Mario costume to my boy who has a great fondness for the Mario Kart game. He thought it was ok...but could we please make a car for him to race in. *sigh*
So I didn't get off the handmade hook this year entirely...
but this was more of a 'daddy & me' project for the two of them. *wink, wink*
I think they've done a great job so far by altering a cardboard box with tape & hot glue. Now they only need to add paint & the boy will be race... I mean, 'trick or treat' ready!
Feel free to share your Halloween costume plans!
Subscribe to:
Comments (Atom)


