Thursday, August 29, 2013

Happy to share that isewcute on etsy had an item featured in the etsy finds email entitled 'Orange You a Tease' on August 23rd!

This is my harvest love glitter ring. I handcast each heart from resin & a mix of various orange glitters & then mount them to an adjustable silver plated ring, so it fits most. It's avalable all through the fall season from 'back to school' to Halloween & right on through Thanksgiving. It's a great way to add a little sparkle to your Fall wardrobe fashion style. It also makes a great gift for someone with a fall birthday or anniversary!


I'm so tickled to share that this piece has also been featured on 'Glitter and Nails'... a fun place to check out the latest nail art beauty trends in France!


I'm starting to craft for the long winter months ahead, so if you'd like to peek at what I'm up to, please become a fan on facebook!
isewcute on Facebook: www.facebook.com/isewcute

Here are a couple more photos of the harvest orange ring to show how much this piece sparkles! I love it!


Stay Sparkly!

Monday, August 5, 2013

Easy Peasy Recipe - Ohio Buckeyes - Peanut Butter Balls Dipped in Chocolate... oh yeah baby!!!

The other day I made buckeyes with my boy. Buckeyes are essentially peanut butter balls dipped in a chocolate coating & they're so fun & easy to make, I thought I'd share this recipe with you. This confection gets its name from its resemblance to the nut from the buckeye tree. See here.

Peanut Butter Balls:

Ingredients:
1 1/2 C. Peanut Butter - smooth
1/2 C. butter
1 lb. confectioners sugar (powdered sugar)
1 Tbsp. Vanilla

Soften the butter & add peanut butter. Mix in vanilla & then add the sugar. If dough does not easily roll into balls, then add a bit more peanut butter. Roll into balls 1 - 1.5" in size.

Chocolate Coating:

Ingredients:
1/2 bar of parrafin wax
1 12 oz. package of chocolate chips...either milk chocolate or semi sweet chips...your preference.

Melt together in double boiler.

Use a toothpick to dip the peanut butter balls into the chocolate coating & leave the top uncovered to resemble a buckeye.

Enjoy!

I'll be sharing this over at www.craftster.org as well in their cooking/dessert section, so be sure & check craftster out for more fab food & craft ideas!

Saturday, June 1, 2013

Latest Craftster Craft Swapping - I made a cute clutch purse & received a lovely new craft to explore... spinning with a drop spindle!

I'm so excited to share with y'all what a splendiferous mail day I had today! Yesterday I was in such an unexplainable blue mood & today is the polar opposite! I woke up cheerful after one of the best night's sleep in a month of Sundays & then when I called the postal office about a package I had been anticipating from a swap on craftster, the sweet voice on the phone replied, "it's here!" ...so on to the good stuff!

The swap was a make a friend swap...so in this type of swap you have the opportunity to get to know a fellow crafter. The items to be swapped were something you do well (crafted item), something you love (non-crafted item), and a surprise...up to you if it is crafted or not.

I learned mid-way through the swap process that beading is not something I do well. I thought how hard can this be if I follow a pattern? Well, I guess I had problems following the pattern because I messed up my rows & the image I was going for ended up skewed. I scrapped that idea & sought inspiration elsewhere...& went with something I knew I wouldn't mess up.

I made a cute batik blue & green pieced clutch purse with a kiss lock frame based on my partner's likes. The purse was time consuming certainly due to piecing & selecting the fabric squares to make an attractive pattern. The construction of the purse itself was fairly easy because of the fabulous pattern & instructions I got at While Baby Naps on etsy. I also bought the fabric glue, frame, & chain from them. It was a great etsy experience with super fast shipping & great communication. I highly recommend their shop to other crafters out there looking to make something similar.


The work in progress...making sure I had bits of fabric that looked good next to each other...then cutting them into rows of squares...


Sewing....


Lining up the different rows so that no two of the same pattern were next to each other. I wanted a nice contrast where the squares complimented each other. Once this was done & my pieced fabric panels were done, I could cut out my pattern.


After adding fuseable interfacing, pressing, sewing & turning, this is what it looked like... all ready for the frame.


I attached the frame one side at a time...allowing the first side to dry completely before attaching the other side. This part made me nervous that I would somehow screw it up, but it went together fairly well. Doing a dry run to see if the pattern fit the frame before adding the glue is definitely a must. It would be tragic to have done all that hard work, only to mess it up in the final stage of the process.


I love how this project turned out! The colors are so yummy & bright... super cute for summer! It makes me think of the Earth & Sea!
Here are a couple more glamour shots of the final piece:


I'd love to make a few more of these in different fabrics... vintage linens, kawaii cute Japanese prints, & more colorful rainbow batiks! I'm officially hooked!

Here is the whole package I sent to my partner:

There is the purse, one of my resin glitter bubble rings, some tea by teaman on etsy, a tube of glitter, and an Ohio magnet. My partner is also from Ohio...so it seemed a good match! The glitter & the tea are my loves... I can't not walk into a craft store without buying at least one tube of the twinkly stuff... and teaman's tea is the best! If you love tea, try the Christmas blend or black raspberry. They're my personal favorite!
The ring is the item I do well. I've gained a lot of experience working with resin & wanted to send something sparkly to my partner that she could wear out to the pool or the beach...it's waterproof & so twinkly in the sunshine!


Here is the super amazing package I received from my partner, Loves2experiment, on craftster!

When I opened the box, Hello Kitty was looking back at me! I knew this was going to be really good!


What an unexpected delight! A book about a craft I have not yet tried & was looking into just this week! Seriously, I googled how to make yarn & spinning with a drop spindle! ...you can even ask my BFF Kelly...she'd vouch for me! ;)

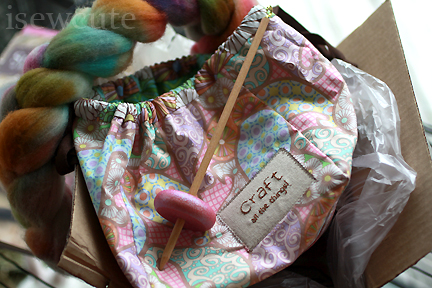
The cutest craft bag... with one of my favorite quotes inspired by Hyperbole and a Half! "Craft All the Things!" LOVE, LOVE, LOVE IT!

...and there's more inside!

...super squishy fiber & a drop spindle...no, a 'glittery' drop spindle!!!
Just look at the eye candy colors!

I need to learn how to use this asap! I'm so excited!

A closeup of the gorgeous lining fabric in the pouch... so beautiful!

The surprise goodie my partner sent was a crafted unicorn zipper pouch. The unicorn is embroidered! My daughter would claim it if I let her see!

How cute is that?!!

And finally, the goodie my partner can't live without...or something she loves... candy! You can't go wrong with candy!


This has been a super-fun craftster swap & I had as much fun crafting for it as I had fun opening all the goodies! I can't wait to try spinning & hopefully will have updates on my adventures with that soon! Thank you so much Loves2experiment! I'm over-the-moon thrilled with my goodies & you made such a beautifully crafted & thoughtful package! I'm going to treasure it!!!

Stay crafty!

Wednesday, May 22, 2013

Quick & Easy Gift for Teacher ...easy peasy kid craft idea!


This morning before school, my daughter approached me about giving her teacher a gift on the last day of school... which is today. I thought quick to have my girl do some mini artworks & insert them into one of those photo totes (which thankfully I had on hand in my craft room) ...along with a couple of photos of my daughter's class & her with the teacher.

This was so easy, quick, & fun... and it was budget friendly too!


If you try this, please let us know! We'd love to hear you were inspired!


WELCOME SUMMER!!!

Monday, May 6, 2013

Mani Pedi How to Ombre Rainbow Nails by isewcute

I'm long over due for a how to post, so when I painted my nails a fun kawaii, ombre rainbow, I knew I had to share with y'all! This was so easy guys!

The colors I used:
Sally Hansen Extreme Wear 360 'mellow yellow'
Sally Hansen Extreme Wear 90 'sun kissed'
Sally Hansen Extreme Wear 23 'fuchsia power'
Sally Hansen insta-dri 420 'lively lilac'
Sally Hansen insta-dri 28 'mint sprint'
Sally Hansen Extreme Wear 02 'green with envy'
Sally Hansen Extreme Wear 130 'blew me away'


I'm sure it can be improved upon, but for a first go at it, I'm well pleased with the results!

Also I used a clear fast drying top coat.

Simply brush one color on one half of your nail such as yellow...and then on the other half, brush on a complimentary color such as red...so that when they come together they make the 3rd color you'll brush on in the center...(orange).
Quickly, before it dries, brush on the clear coat & kind of wiggle the brush as you apply it to soften the edges between your colors & give the whole thing a nice smooth shine.

I'm loving this even more than when I did the glitter tips french manicure...and it takes a lot to make me like something more than glitter!

Enjoy & feel free to share your results if you try it! I'd love to see!

Saturday, March 2, 2013

isewcute was featured today over at Mom's Basement

Oh happy day!
My galaxy rings were mentioned in a blog post over at Mom's Basement! If you'd like to see all my currently available galaxy inspired jewelry, you may find it here. I have a few necklaces, many rings, & plan on adding keyrings & earrings this spring.
I'm very excited about my new line of cosmic galaxy space jewelry for this year!
<

Thank you to Michelle from Fun With Needles for the heads up about it!
If you have a minute, check out Michelle's shop! She makes great geekery cross stitched gifts such as jewelry & decor for the home!

Thursday, November 22, 2012

Pumpkin Whipped Cream Recipe... you don't even really need to eat it with pie it's so good!


Ingredients:

1 pint of heavy whipping cream
1/2 cup sugar
1/3 cup canned pumpkin
dash of nutmeg or pumpkin pie spice
1 tsp. vanilla


In a chilled bowl, beat the cream until stiff peaks begin to form. Add in remaining ingredients & mix thoroughly.

I swear this is so good...it tastes like pumpkin pie!

To reduce calories, you can substitute splenda for the sugar.


Happy Thanksgiving everybody!

Christmas & winter holiday resin glitter jewelry at isewcute on etsy!

Hello all! It's that time of year again! I've been crafting up some of my classic sparkly resin snowflake rings as well as many brand new one of a kind winter & holiday themed resin pendant necklaces & sparkly statement rings with glitter, santas, deer, & snowmen!
This is my original big snowflake dome ring...back again for another season...available in the shop now!
This is a brand new funky mod sparkly 'snowflake' ring in winter white! It sparkles just like sunlight on snow! I had so much fun crafting this whimsical resin ring!

I will be listing a few one of a kind novelty big statement pendant necklaces in the shop over the next 2 weeks! Check out my Christmas & winter holiday section to see whats in store! I have Santas & elves like this one available now at isewcute.

If you know a girl who made Santa's 'nice' list, she deserves something fun & sparkly from http://www.isewcute.etsy.com

I've crafted some new dome rings which are like Christmas ornaments for your fingers!
This one makes me think of a shiny brite ornament! It has those classic cool Christmas colors swirling around inside!
This christmas crimson red glitter dome ring is perfect for children aged 5 & up... or for more delicate hands. This ring fits both my 6 year old daughter & me.

This lovely mini glitter heart would look lovely all year long...not only for the holidays...even though it's that festive & sparkly!
Twinkly red glitter heart ring available now!

This sweet little friendly deer winter necklace will make it's debut in the shop next week!

I've handcast some new resin glitter holiday pendants in this sweet small heart size... for those who like a little sparkle, but not big gaudy baubles. (you know if it sparkles, I love it all no matter how big or small!)
This sweet Santa pendant necklace would look so lovely on a girl wearing her holiday dress, as well as being paired with jeans & worn to school! Coming soon!
Snowflake necklace coming soon!